upgrade hw-sw nexus 7K cisco from sup1 to sup2
14.11 2019 | by massimilianoPROCEDURA DI UPGRADE HARDWARE E SOFTWARE NEXUS 7000 CISCO FROM SUP-1 TO SUP-2 La procedura […]
https://www.ingegnerianetworking.com/wp-content/uploads/2019/11/N7K-sup2-85f-1.png
PROCEDURA DI UPGRADE HARDWARE E SOFTWARE NEXUS 7000 CISCO FROM SUP-1 TO SUP-2
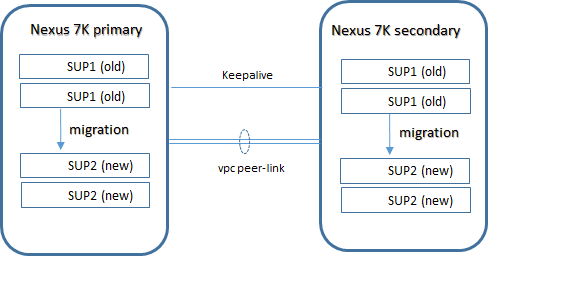
La procedura prevede l’operatività prima per il N7K di backup eppoi per quello active:
- STEP-1: inserimento di una USB drive cisco nella porta USB1 della SUP1 in modalità active;
- STEP-2: formattazione USB drive;
- N7K# format usb1:
- STEP-3: salvare la running-config nella USB drive inserita nella porta usb1 della SUP1;
- N7K# copy running-config usb1: running_config_N7K vdc-all
- STEP-4: backup delle licenze installate nella USB drive inserita nella porta usb1 della SUP1;
-
- N7K# copy licenses usb1: licenses_archive_N7K.tar
- STEP-5: determinare la release target da applicare al software kickstart and system per l’upgrade: le SUP2 new dedicate per la coppia di Nexus 7000 hanno installata la 6.2(18) ad esempio
- STEP-6: distaccare la USB drive cisco con le copie della running-config VDC e delle license dalla porta usb1 della SUP1 active;
- STEP-7: spegnimento del N7K (prima il Nexus secondary e successivamente il Nexus primary) ed a macchina spenta sostituire le SUP1 (old) con le SUP2 (new); assicurarsi sempre di avere le SUP dello stesso tipo e mai mixare SUP1 con SUP2
- STEP-8: accensione del Nexus N7K ed al riavvio del devices una delle due nuove SUP2 assumerà il ruolo di active (notare che la SUP2 standby al momento dell’accensione si posiziona in uno status di powered-up (no boot) e solo dopo un tempo di attesa (circa parecchi minuti) avviene la corretta sincronizzazione della stessa e la posizione di standby in HA.
- STEP-9: seguire il boot device;
Abort Auto Provisioning and continue with normal setup ?(yes/no)[n]: yes
Starting Auto Provisioning…Done
—- System Admin Account Setup —-
Do you want to enforce secure password standard (yes/no) [y]: yes
Enter the password for “admin”: cisco
Confirm the password for “admin”: cisco
Do you want to enable admin vdc (yes/no) [n]: no
—- Basic System Configuration Dialog VDC: 1 —-
This setup utility will guide you through the basic configuration of the system. Setup configures only enough connectivity for management of the system.
Please register Cisco Nexus7000 Family devices promptly with your supplier. Failure to register may affect response times for initial service calls.
Nexus7000 devices must be registered to receive entitled support services.
Press Enter at anytime to skip a dialog. Use ctrl-c at anytime to skip the remaining dialogs.
Would you like to enter the basic configuration dialog (yes/no): no
2019 April 1 15:29:34 switch %$ VDC-1 %$ %COPP-2-COPP_POLICY: Control-Plane is protected with policy copp-system-p-policy-strict.
User Access Verification
login: admin
Password:
Cisco Nexus Operating System (NX-OS) Software TAC support: http://www.cisco.com/tac
Copyright (c) 2002-2017, Cisco Systems, Inc. All rights reserved.
The copyrights to certain works contained in this software are owned by other third parties and used and distributed under license.
Certain components of this software are licensed under the GNU General Public License (GPL) version 2.0 or the GNU
Lesser General Public License (LGPL) Version 2.1. A copy of each such license is available at
http://www.opensource.org/licenses/gpl-2.0.php and
http://www.opensource.org/licenses/lgpl-2.1.php
switch#
- STEP-10: inserimento della USB drive cisco, precedentemente utilizzata nella SUP1 ed inserirla nella porta slot0 della SUP2 in modalità active;
- STEP-11: copiare la licenza nella bootflash dalla usb-drive inserita nella porta slot0 della SUP2 in active mode ed seguire la installazione;
switch# copy slot0:licenses_archive_licenses.tar bootflash:
Copy progress 100% 10KB
Copy complete, now saving to disk (please wait)…
switch# tar extract bootflash:licenses_archive_licenses.tar to bootflash:
switch# install license bootflash:TBM16036649_174378678.lic
Installing license ……..done
- STEP-12: copiare la running-config precedentemente salvata, dalla usb-drive inserita nella porta slot0 della SUP2 in active mode:
switch# copy slot0:running_config_N7K running-config
- STEP-13: copiare la running-config in startup-config VDC all
N7K# copy running-config startup-config vdc-all
[########################################] 100%
Copy complete.